 Improved!
Now over 100kV!Improved!
Now over 100kV!
Improved!
Now over 100kV!Improved!
Now over 100kV! Basically, this is a 9-stage cascade fed (preferably) by the 8kV pp, 20kHz
device described above. The point now is, that, instead of buying 16kV
diodes and 8kV caps and soldering them together, you simply take three
of the 30kV TV cascades (see above and
section
Where do I get...) and link them up in
series!
In practice, it's not quite that simple, of course...
Basically, this is a 9-stage cascade fed (preferably) by the 8kV pp, 20kHz
device described above. The point now is, that, instead of buying 16kV
diodes and 8kV caps and soldering them together, you simply take three
of the 30kV TV cascades (see above and
section
Where do I get...) and link them up in
series!
In practice, it's not quite that simple, of course...  There are two problems: (1) The TV cascades are not complete 3-stage cascades,
as you see in the diagram. They lack exactly one cap. That doesn't matter
much when used alone (see 30kV TV cascade
), but you can't simply link them up as in
simple
10kV cascade . (2) Actually, they don't even have the "ac out"
output at all, there's just nothing to link the second input to :-)
There are two problems: (1) The TV cascades are not complete 3-stage cascades,
as you see in the diagram. They lack exactly one cap. That doesn't matter
much when used alone (see 30kV TV cascade
), but you can't simply link them up as in
simple
10kV cascade . (2) Actually, they don't even have the "ac out"
output at all, there's just nothing to link the second input to :-)
 |
 |
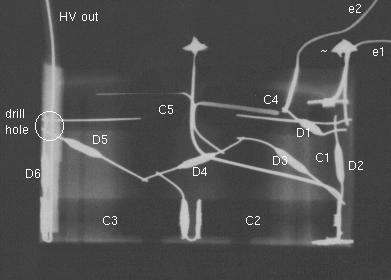
(2) is easily solved:-) First you have to know how the cascade is build up internally. The image above left is an X-ray of one of mine (I simply asked a doctor to take it). If you've got the same type as me (see photos), you can rely on this one. Otherwise probably not :-). Find out where the last diode lies and carefully drill/carve a hole into the plastic housing so that you hit the correct end of the diode (marked in the image). Carve out the plastic around the metal lead, solder a short end of high voltage cable (e.g. the hv output cable of the cascade!) to the lead and glue in the cable with epoxy glue. The right image shows how it should look like. Now, if you're already making a mess, drill out the earth and ac in cables, connect the two earth leads (e1,e2) internally, and glue in hv cable, one for the ac input, one for the combined earth. You'll have to do the latter with only two of the cascades.
To solve (1), you need two caps of about 100pF (the more the better), 10kV. You might find these in a portable TV set, where sometimes a discrete one-stage cascade is used. Solder the three prepared cascades with the two extra caps between them together, as shown in the diagram. That's it, your super-cascade ist ready.
 There's one more thing: if you power up the super-cascade now, you'll find
that it sprays heavily (which is not funny, as you get charged up continually
and abruptly discharged when you touch something). This also prevents the
voltage to fully build up. To prevent spraying, you have to put a large
enough conducting sphere around any sharp edges (such as the solder points
between the cascades). I used a certain kind of chocolate sweets that contain
a little toy housed in such plastic spheres (diameter about 4cm). On the
right, you see one of them half open, with the cap inside. I made them
conducting with graphite spray on the outside. I also filled a narrow PVC
hose with water, glued in a metal terminal at one end and attached the
other to the final output. This works as a discharge current limiting resistor,
which is advisable if you don't want to destroy your device after a short
time. In the first picture of this section you see the complete super-cascade
in operation. You can also see that there's a bubble in the PVC hose :-)
There's one more thing: if you power up the super-cascade now, you'll find
that it sprays heavily (which is not funny, as you get charged up continually
and abruptly discharged when you touch something). This also prevents the
voltage to fully build up. To prevent spraying, you have to put a large
enough conducting sphere around any sharp edges (such as the solder points
between the cascades). I used a certain kind of chocolate sweets that contain
a little toy housed in such plastic spheres (diameter about 4cm). On the
right, you see one of them half open, with the cap inside. I made them
conducting with graphite spray on the outside. I also filled a narrow PVC
hose with water, glued in a metal terminal at one end and attached the
other to the final output. This works as a discharge current limiting resistor,
which is advisable if you don't want to destroy your device after a short
time. In the first picture of this section you see the complete super-cascade
in operation. You can also see that there's a bubble in the PVC hose :-)